CS472 - CI - Using GitHub Actions - Setting up workflow
Labs
This individual assignment is due Sept 24th, 2024
In this lab, you will kick off from where you stopped in the Testing lab and build a GitHub Action Continuous Integration pipeline. This pipeline will run automatically when you push/commit your code to the GitHub repository based on the events described in the workflow.
You will push changes to your cloned repo at the end of this lab. This requires you
to authenticate with GitHub using a personal access token (ref. Git & GitHub lab).
Task 1: (5 points)
- In this lab, we will only focus on the TDD. You will use the code you cloned and updated (Python Testing lab)
- On the root directory of your repo, create the directory structure
.github/workflows/and create a file calledworkflow.yml. You can use the two commands below.mkdir -p .github/workflows touch .github/workflows/workflow.yml - Create a Workflow: Every workflow starts with a name. The name will be displayed on the Actions page and on any badges. Give your workflow the name
CI workflowby adding aname:tag as the first line in the file. - Add Event Triggers: Event triggers define which events can cause the workflow to run. You will use the
on:tag to add the following events: 1) Run the workflow on every push to the main branch and 2) Run the workflow whenever a pull request is created to the main branch.- Add the
on:keyword to the workflow at the same level of indentation as thename: - Add a
push:event as the first event that can trigger the workflow. This is added as the child element ofon:so it must be indented under it. - Add the
"main"branch to the push event. You want the workflow to start every time somebody pushes to the main branch. This also includes merge events. You do this by using the branches: keyword followed by a list of branches either as[]or- - Add a
pull_request:event similar to the push event you just finished. It should be triggered whenever the user makes a pull request on the main branch.
- Add the
- Add a Job: You will now add a job called build to the workflow file. This job will run on the
ubuntu-latestrunner. Remember, a job is a collection of steps that are run on the events you added in the previous step.- Add the
jobs:section to the workflow at the same level of indentation as thename(i.e., no indent). - Next, you need to name the job. Name your job
build:by adding a new line under thejobs:section. - Finally, you need a runner. Tell GitHub Actions to use the
ubuntu-latestrunner for this job. You can do this by using theruns-on:keyword.
- Add the
- Target Python 3.9: It is important to consistently use the same version of dependencies and operating system for all phases of development including the CI pipeline. This project was developed on Python 3.9, so you need to ensure that the CI pipeline also runs on the same version of Python. You will accomplish this by running your workflow in a container inside the GitHub action.
- Add a
container:section under the runs-on: section of the build job, and tell GitHub Actions to usepython:3.9-slimas the image.
- Add a
- Save and commit your changes to your repository.
When you click on Actions tab in your repository, you should be able to see screen like the one below.

Task 2 (5 points)
In this task, you will continue building the Continuous Integration pipeline by setting up the steps under job in your workflow. As a result, your application shall be automatically built and tested when you commit your code to the GitHub repository.
- Add the
steps:section underbuildjob in the workflow file. - Add the checkout step as the first step. Give it the
name:Checkoutand call the actionactions/checkout@v3by using theuses:keyword. - Install Dependencies: Now that you have checked out the code, the next step is to install the dependencies. This application uses pip, the Python package manager, to install all the dependencies from the PyPI package. The
pipcommand refers to therequirements.txtfile for the list of dependencies. Thepython:3.9-slimcontainer you are using already has the pip package manager installed. The commands that you will use in this step are:
    python -m pip install --upgrade pip
    pip install -r requirements.txt
- Add a new named step after the checkout step. Name this step
Install dependencies. - Next, you want to run the commands to update the package manager
pipand then install the dependencies. Since there are two commands, you can run these inline using therun:keyword with the pipe|operator.- Lint with flake8: It is always a good idea to add quality checks to your CI pipeline. This is especially true if you are working on an open source project with many contributors. This makes sure that everyone who contributes is following the same style guidelines.
The next step is to useflake8to lint the source code. Linting is checking your code for syntactical and stylistic issues. Some examples are line spacing, using spaces or tabs for indentation, locating uninitialized or undefined variables, and missing parentheses. Theflake8library was installed as a dependency in therequirements.txtfile.
The flake8 commands take a few parameters. Now, take a look at the command and the parameters:
flake8 src --count --select=E9,F63,F7,F82 --show-source --statisticsThis command will run
flake8for the src folder of your repository. By adding the following options, you customize the linting process: - Lint with flake8: It is always a good idea to add quality checks to your CI pipeline. This is especially true if you are working on an open source project with many contributors. This makes sure that everyone who contributes is following the same style guidelines.
--count: shows the count of all warnings and errors in the result of the command--select=E9,F63,F7,F82: limits the checks to syntax errors--show-source: adds the actual line number where the error/warning is found-
--statistics: shows the count of each type of error and warning in the resultflake8 src --count --max-complexity=10 --max-line-length=127 --statisticsUnlike the first command that checks for syntax errors only, the second command will run all the available checks on the src folder of your repository.
- Add a new named step after the
Install dependenciesstep. Call this stepLint with flake8. - Next, you want to run the
flake8commands to lint your code. The commands are explained in detail aboveflake8 src --count --select=E9,F63,F7,F82 --show-source --statistics flake8 src --count --max-complexity=10 --max-line-length=127 --statisticsYou can run inline commands using the
run:keyword with the pipe|operator. - In the file
requirements.txtthe dependency forflake8is missing. Includeflake8, otherwise CI build will not succeed.
- Test Code Coverage with pytests: You will use pytest in this step to unit test the source code. Pytest is configured via the included
pytest.inifile to automatically include the flags-–with-specand–-spec-colorso that red-green-refactor is meaningful. If you are in a command shell that supports colors, passing tests will be green and failing tests will be red.
Pytest is also configured to automatically run the coverage tool, and you should see a percentage of coverage report at the end of your tests.- Add a new named step after the
Lint with flake8step. Call this stepRun unit tests with pytests. - Next, you want to run the
pytestscommand to test your code and report on code coverage.pytest -v --tb=short --color=yes --cov=src --cov-report=term-missingSince you are running a single command, you do not have to use the pipe
|operator withrun.
- Add a new named step after the
- Push Code to GitHub.
When you click on Actions tab in your repository, and then click on the latest workflow run (in green). You should be able to see screen like the one below.
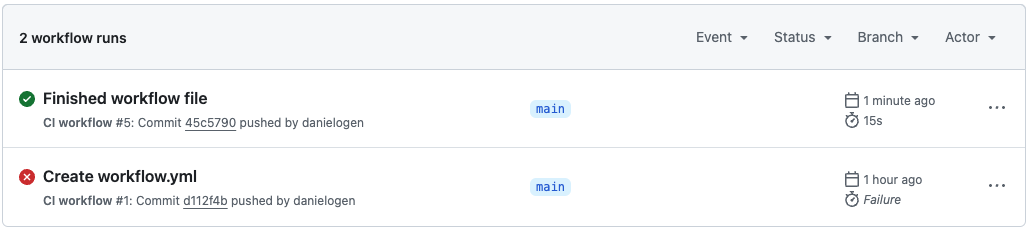
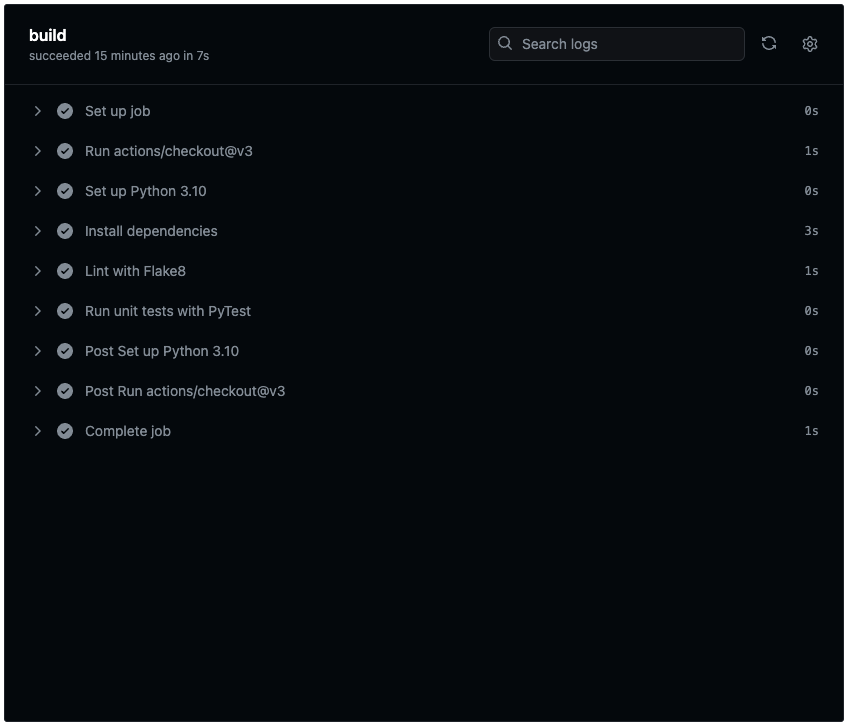
If the CI build did not succeed, you can click and see where a problem could have occurred, then fix it locally and push again.
Clicking on Run unit tests with pytest, you should be able to see the screen below.
Fig 4: CI builds
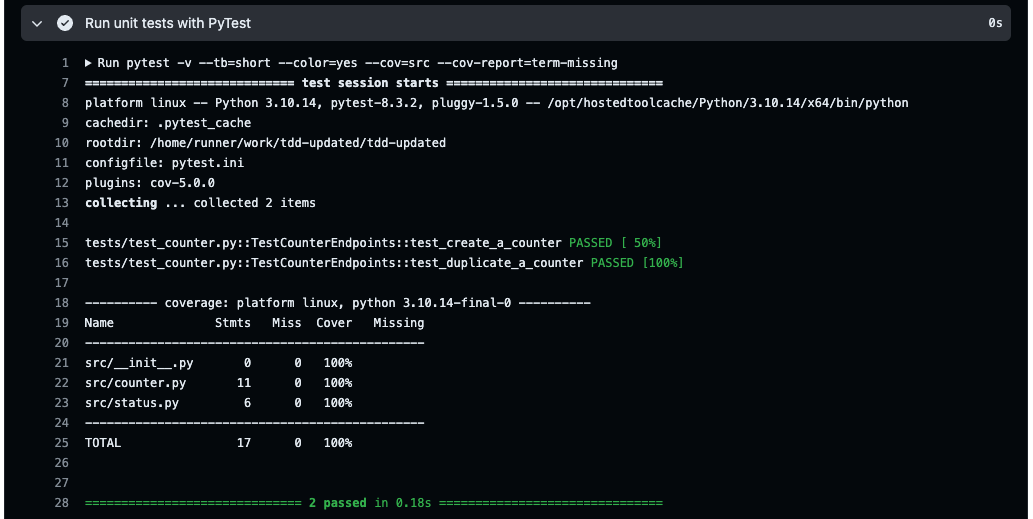
- From the image above, we can see that there are three
Test Casesfor thecounter.pyfile. These are theTest Casesyou were required to write in the Testing lab. In this lab, you will write one more test case, using the red/green/refactor workflow, and push the code in your repository. You should be able to see that the fourthTest Casesturns GREEN in your CI builds.
You will write a test case to delete a counter. (10 points)
Per REST API guidelines, a delete uses a DELETE request and returns a 204_NO_CONTENT code if successful. Create a function that deletes the counter that matches the specified name.
Like in the Testing Lab, detail the phases (red/green/refactor) you followed to implement the requirements. Include in your report the code snippets you wrote at every step as well as the exceptions you encountered while running pytests. Make your report self-contained so that it is easy to follow without running your code.
Remember to commit your code.
Submitting the Assignment
- Write a report for all the tasks. Include a link to your GitHub repository at the start of the report.
- Make sure that your repository is public so that we are able to access repository.
- To show that you were able to complete the tasks. Include screenshots for each task in your report. The screenshots should include the address bar of the browser so that we are able to see repo name.
- Submit your report on Canvas